Spring&Spring Boot使用手册
Spring
Spring IOC
控制反转,即将对象创建、赋值的动作交给Spring容器去管理。实现类对象的自动装配、注入。
使用方法:
- 使用@Component注解注册Bean。
@Service
public class UserServiceImpl implements UserService {
}- 使用@Autowired注解指定需要Spring容器注入的对象。
@RestController
public class UserController {
    private final UserService userService;

    public UserController(@Autowired
    UserService userService) {
        this.userService = userService;
    }
}
Spring AOP
什么是AOP
AOP(Aspect-Oriented Programming:面向切面编程)能够将与业务无关的,却被多个业务调用的公共逻辑或处理(比如日志、事务、权限控制等)封装起来,减少系统的重复代码,降低耦合度,有利于提高系统的可维护性和拓展性。
Spring AOP是如何的?
Spring AOP属于运行时增强,是基于动态代理的,不支持内部调用的代理。
- 如果要代理的对象实现了某个接口,会使用JDK Proxy生成代理对象。
- 如果要代理的对象没有实现接口,就会使用Cglib生成一个代理对象的子类来代理。
AspectJ
AspectJ属于编译时增强,是基于字节码操作的,是目前JAVA生态中最成熟的AOP框架。Spring AOP已经集成了AspectJ,但只是使用了AspectJ注解的一小部分。
AOP概念
- 通知(Advice):AOP框架中的增强处理,通知描述了切面何时执行何时处理
- 连接点(Join Point):连接点表示应用程序执行过程中能够插入切面的一个点,可以是方法调用前、方法调用后,方法返回后,方法抛出异常后、环绕通知。在SpringAOP中连接点总是方法的调用。
- 切点(Point Cut):可以插入通知/增强的连接点。
- 切面(Aspect):切面是通知/增强和切点的结合。
- 引入(Introduction):引入允许我们向现有类添加属性或方法。
- 织入(Weaving):将增强处理添加到目标对象中,并创建一个代理类,这个过程称为织入。
AspectJ定义的通知类型
- Before(前置通知):目标对象的方法调用之前触发
- After (后置通知):目标对象的方法调用之后触发
- AfterReturning(返回通知):目标对象的方法调用完成,在返回结果值之后触发
- AfterThrowing(异常通知) :目标对象的方法运行中抛出 / 触发异常后触发。AfterReturning 和 AfterThrowing 两者互斥。如果方法调用成功无异常,则会有返回值;如果方法抛出了异常,则不会有返回值。
- Around (环绕通知):编程式控制目标对象的方法调用。环绕通知是所有通知类型中可操作范围最大的一种,因为它可以直接拿到目标对象,以及要执行的方法,所以环绕通知可以任意的在目标对象的方法调用前后搞事,甚至不调用目标对象的方法
PointCut的12种用法
1. execution
使用execution(方法表达式)匹配方法执行
2. within
within(类型表达式):目标对象target的类型是否和within中指定的类型匹配
3. this
this(类型全限定名):通过aop创建的代理对象与指定的类型匹配,代理对象是否是指定类型或指定类型的子类。可以用于继承了接口的类上。
4. target
target(类型全限定名):判断目标对象的类型是否是指定类型或指定类型的子类。
5. args
args(参数类型列表):匹配当前执行的方法传入的参数类型是否是指定的类型。args属于动态切入点,执行方法时进行旁段,开销非常大,一般不推荐。
6. @within
@within(注解类型):匹配被指定的注解类型注解的类内定义的所有方法。
7. @target
@target(注解类型):判断目标对象target类型上是否有指定的注解;@target中注解类型也必须是全限定类型名。要搭配其他类型使用,先匹配出目标对象,再解析@target
8. @args
@args(注解类型):方法参数所属的类上有指定的注解;注意不是参数上有指定的注解,而是参数类型的类上有指定的注解。要搭配其他类型使用,先匹配出方法,再解析@args
9. @annotation
@annotation(注解类型):匹配有被指定的注解类型注解的方法。
10. @bean
bean(bean名称):这个用在spring环境中,匹配容器中指定名称的bean。
11. reference pointcut
@Pointcut("完整包名类名.方法名称()")表示引用其他命名切入点。
12. 组合型的pointcut
Pointcut定义时,还可以使用&&、||、!运算符。
Spring Boot 使用Spring AOP
- 引入依赖
<dependency>
<groupId>org.springframework.boot</groupId>
<artifactId>spring-boot-starter-aop</artifactId>
</dependency>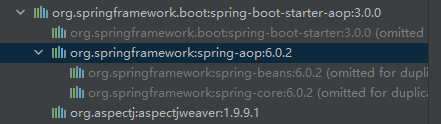 2. 使用@Aspect、@Component注解类,将类定义为切面类。
@Aspect
@Component
public class ControllerAspect {
}- 使用@PointCut注解方法,并提供切点表达式,声明一个切点。
@Aspect
@Component
public class ControllerAspect {

    @Pointcut("execution(* com.chenzhuowen.springbootstudy.controller.*.*(..))")
    public void controllerPointCut() {
    }
}- 使用@Before、@After、@AfterReturning、@AfterThrowing、@Around注解方法,并提供切点,声明一个通知/增强。
@Aspect
@Component
public class ControllerAspect {

    @Pointcut("execution(* com.chenzhuowen.springbootstudy.controller.*.*(..))")
    public void controllerPointCut() {
    }

    @Before(value = "controllerPointCut()")
    public void before(JoinPoint joinPoint) {
        String methodName = joinPoint.getSignature().getName();
        String className = joinPoint.getSignature().getDeclaringTypeName();
        System.out.println(className + methodName + " before aspect");
    }
}
Spring MVC
MVC是一种软件设计模式,是模型(Model)、视图(View)、Controller(控制器)的简写,核心思想是将业务逻辑、数据和显示分离。
SpringMVC是目前最优秀的MVC框架,天生与Sring框架集成。
SpringMVC下我们一般把后端项目分为以下几层:
- Service层(处理业务)
- Dao层(数据库操作)
- Entity层(实体类)
- Controller层(控制层)
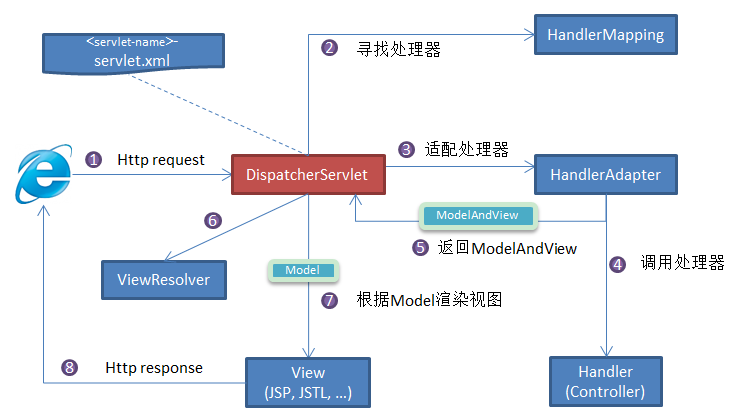
Spring MVC的核心组件
- DispatcherServlet:核心的中央处理器,负责接受、分发和响应请求。
- HandlerMapping:处理器映射器
- HandlerAdapter:处理器适配器
- Handler:请求处理器
- ViewResolver:视图解析器
SpringMVC工作原理
Spring事务
Sping管理事务的两种方式
- 编码式事务:在代码中硬编码,通过
TransactionTemplate或者TransactionManager手动管理事务。 - 声明式事务:在XML配置文件中配置或直接基于注解(
@Transaction注解)。
Spring事务的传播行为
当事务方法被另一个事务调用时,必须指定事务应该如何传播。
事务传播行为如下:
1.TransactionDefinition.PROPAGATION_REQUIRED 默认的事务传播行为。如果当前存在事务,则加入事务。如果事务不存在,则创建事务。 2. TransactionDefinition.PROPAGATION_REQUIRES_NEW 创建一个新事务,如果当前存在事务,则把当前事务挂起。相当于与当前事务隔离。 3. TransactionDefinition.PROPAGATION_NESTED 如果当前存在事务,则生成一个当前事务的嵌套事务。如果当前没有事务,则创建事务。 4. TransactionDefinition.PROPAGATION_MANDATORY 如果当前存在事务,则加入事务。如果不存在,则抛出异常。 5. TransactionDefinition.PROPAGATION_SUPPORTS 如果当前存在事务,则加入事务。如果当前没有事务,则以非事务模式运行。 6. TransactionDefinition.PROPAGATION_NOT_SUPPORTED 以非事务模式运行,如果当前存在事务,则挂起当前事务。 7. TransactionDefinition.PROPAGATION_NEVER 以非事务模式运行,如果当前存在事务,则抛出异常。
异常回滚机制
@Transactional(rollbackFor = Exception.class)
当配置rollbackFor属性时,可用若方法抛出异常,可用回滚事务。 若没有配置rollbackFor属性,默认只在遇到RunTimerException时才会回滚事务。
Spring&Spring Boot常用注解
1. @SpringBootApplication
这个注解在项目中很少直接使用但是非常重要,它时Spring Boot项目的基石,相当于是@SpringBootConfiguration、@EnableAutoConfiguration、@ComponentScan注解的集合。 这三个注解的作用如下:
@EnableAutoConfiguration:启动SpringBoot自动装配机制@ComponentScan:扫描被@Component(@Repository、@Service、@Controller)注解的bean,注解默认会扫描该类所在的包下的所有类。@SpringBootConfiguration:允许中Spring上下文中注册额外的bean或导入其他配置类。
2.Spring Bean相关
2.1. @Autowired
表示某个对象是一个SpringBean对象,需要装配到容器中。
@Autowired属于Spring内置的注解,默认的注入方式为byType(根据类型匹配),也就是会优先根据接口类型去匹配并注入Bean。当一个接口有多个实现类时,byType就无法正确注入了,这时候注入方式会变为byName,即按照变量名(首字母小写)去匹配实现类。
@Autowired
Service serviceImpl;
2.1.1. @Qualifier
通常我们使用@Qualifier注解来显示指定名称,而不是依赖变量名
@Autowired
@Qualifier("serviceImpl")
Service service;2.2.@Component、@Repository、@Service、@Controller
@Repository:对应持久层即Dao层,主要用于数据库相关操作。@Service:对应服务层,涉及复杂逻辑。@Controller:对应控制层,用于接受用户请求,调用Service层并将返回的结果返回给用户。@Component:通用注解,不知道属于那层时,用这个注解。
2.3.@Bean
@Bean一般用于注解方法,表示这个方法返回的对象需要加载到容器中。
2.4. @RestController
@RestController是@Controller和@ResponseBody的合集,表示这是一个控制器Bean,并将返回值直接填入HTTP的响应体中,是REST风格的控制器。
单独使用
@Controller时,返回值需是一个页面模板。
2.5. @Scope
声明Bean的作用域,作用域有如下4种:
singleon:唯一的bean实列。prototype:每次请求创建一个新的bean实列。request:每次http请求都会产生一个新的实列,该bean仅在HTTP Requestion内有效。session:每一个HTTP Session会产生一个新的实列,该bean仅在HTTP Session内有效。application/global-session(仅web应用有效):每一个web应用启动时创建一个bean,这个bean在应用启动时间内有效。websocket(仅web应用有效):每一个websocket会话产生一个bean。
2.6. @Configuration
一般用于声明配置类。
3. 处理常见的 HTTP 请求类型
3.1. GET 请求,查询
@GetMapping("/users") 等价于@RequestMapping(value="/users",method=RequestMethod.GET)
3.2. POST 请求,创建
@PostMapping("/users") 等价于@RequestMapping(value="/users",method=RequestMethod.POST)
3.3. PUT 请求,更新
@PutMapping("/users/{userId}") 等价于@RequestMapping(value="/users/{userId}",method=RequestMethod.PUT)
3.4. DELETE 请求,删除
@DeleteMapping("/users/{userId}")等价于@RequestMapping(value="/users/{userId}",method=RequestMethod.DELETE)
3.5. PATCH 请求,更新
一般实际项目中,我们都是 PUT 不够用了之后才用 PATCH 请求去更新数据。
4. 前后端传值
4.1. @PathVariable 和 @RequestParam
@PathVariable用于获取路径参数,@RequestParam用于获取查询参数。
4.2. @RequestBody
用于读取 Request 请求(可能是 POST,PUT,DELETE,GET 请求)的 body 部分。当Content-Type 为 application/json 格式的数据,接收到数据之后会自动将数据绑定到 Java 对象上去。
5. 读取配置信息
5.1. @Value(常用,但不推荐)
使用 @Value("${property}") 读取比较简单的配置信息,默认读取application文件的配置。
5.2. @ConfigurationProperties(常用)
通过@ConfigurationProperties读取配置信息并与 bean 绑定。
5.3. @PropertySource(不常用)
@PropertySource读取指定 properties 文件
6. 参数校验
通过参数校验注解,可用对前端传入的数据进行校验,避免向后端服务传入违法数据。
所有的注解,推荐使用 JSR 注解,即javax.validation.constraints,而不是org.hibernate.validator.constraints。javax.validation.constraints需要引入spring-boot-starter-validation依赖。
具体用法
- 我们在需要校验的字段上加上字段验证的注解,一些常用的字段验证注解:
@NotEmpty被注释的字符串的不能为 null 也不能为空@NotBlank被注释的字符串非 null,并且必须包含一个非空白字符@Null被注释的元素必须为 null@NotNull被注释的元素必须不为 null@AssertTrue被注释的元素必须为 true@AssertFalse被注释的元素必须为 false@Pattern(regex=,flag=)被注释的元素必须符合指定的正则表达式@Email被注释的元素必须是 Email 格式。@Min(value)被注释的元素必须是一个数字,其值必须大于等于指定的最小值@Max(value)被注释的元素必须是一个数字,其值必须小于等于指定的最大值@DecimalMin(value)被注释的元素必须是一个数字,其值必须大于等于指定的最小值@DecimalMax(value)被注释的元素必须是一个数字,其值必须小于等于指定的最大值@Size(max=, min=)被注释的元素(Array,Collection,Map,String)的大小必须在指定的范围内@Digits(integer, fraction)被注释的元素必须是一个数字,其值必须在可接受的范围内@Past被注释的元素必须是一个过去的日期@Future被注释的元素必须是一个将来的日期- .....
如在需要验证的参数上加上了@Valid注解,在类上加上@Validated注解,即可启用参数验证功能。如果验证失败,它将抛出MethodArgumentNotValidException。
7. 全局处理 Controller 层异常
@ControllerAdvice:注解定义全局异常处理类。其中参数assignableTypes指定要处理异常的Controller类。如果是全局异常,可以不指定。@ExceptionHandler:注解声明异常处理方法。其中参数value指定要处理的异常。
8. JPA 相关
9. 事务 @Transactional
- 作用于类:当把
@Transactional注解放在类上时,表示所有该类的 public 方法都配置相同的事务属性信息。 - 作用于方法:当类配置了
@Transactional,方法也配置了@Transactional,方法的事务会覆盖类的事务配置信息。
10. json 数据处理
@JsonIgnoreProperties作用在类上用于过滤掉特定字段不返回或者不解析。@JsonIgnore一般用于类的属性上,作用和上面的@JsonIgnoreProperties一样。@JsonFormat一般用来格式化 json 数据。@JsonUnwrapped扁平对象
11. 测试相关
@ActiveProfiles一般作用于测试类上, 用于声明生效的 Spring 配置文件。@Test声明一个方法为测试方法@Transactional被声明的测试方法的数据会回滚,避免污染测试数据。@WithMockUserSpring Security 提供的,用来模拟一个真实用户,并且可以赋予权限。
Spring Task
Spring Task 底层是基于 JDK 的 ScheduledThreadPoolExecutor 线程池来实现的。
Spring Task实现定时任务
- 使用
@EnableScheduling注解开启Spring Task功能。一般注解在在Spring启动类上。
@SpringBootApplication
//开启Spring Task定时任务功能
@EnableScheduling
public class SpringbootstudyApplication {

    public static void main(String[] args) {
        SpringApplication.run(SpringbootstudyApplication.class, args);
    }

}- 使用
@Scheduled(fixedRate = 5000)注解方法创建一个定时任务。
int ib = 0;
//@Scheduled开启定时任务,参数指定任务执行间隔
@Scheduled(fixedRate = 1000L)
public void taskB() throws InterruptedException {
    ib++;
    System.out.println("运行taskB" + ib + "当前时间:" + new Date() + ",当前线程:" + Thread.currentThread().getName());
}@Scheduled任务默认在Spring创建的线程数为1的线程池内运行,多个任务需要排队并串行执行。亦可以使用自定义线程池,只需实现SchedulingConfigurer接口的configureTasks方法的类,并用@Configuration注解该类。
//开启Spring Task定时任务功能
@EnableScheduling
@Configuration
public class ScheduledTaskConfiguration implements SchedulingConfigurer {

    private int poolSize = 10;

    public ScheduledTaskConfiguration(@Value("${poolSize:10}") int poolSize) {
        this.poolSize = poolSize;
        System.out.println("taskScheduler线程池大小:" + poolSize);
    }

    @Override
    public void configureTasks(ScheduledTaskRegistrar taskRegistrar) {
        ThreadPoolTaskScheduler threadPoolTaskScheduler = new ThreadPoolTaskScheduler();
        threadPoolTaskScheduler.setPoolSize(poolSize);
        threadPoolTaskScheduler.setThreadNamePrefix("scheduled-task-thread-pool-");
        threadPoolTaskScheduler.initialize();
        taskRegistrar.setTaskScheduler(threadPoolTaskScheduler);
    }
}- 我们可用使用
@EnableAsync注解类和@Async注解方法,开启任务并行执行功能。@Async可以指定自定义的线程池。
//定义Async任务的线程池
//开启任务并行执行功能,需要搭配@Async使用
@EnableAsync
@Configuration
public class AsyncTaskConfiguration {
private int poolSize = 10;
public AsyncTaskConfiguration(@Value("${poolSize:10}") int poolSize) {
this.poolSize = poolSize;
System.out.println("taskScheduler线程池大小:" + poolSize);
}
@Bean("asyncScheduledTakExecutor")
public Executor asyncScheduledTakExecutor() {
return new ThreadPoolExecutor(poolSize, poolSize, 60, TimeUnit.SECONDS, new ArrayBlockingQueue<Runnable>(100));
}
}
@Component
public class ScheduledTask {
List<Integer> list = Arrays.asList(7, 5, 3, 1);
int ia = 0;
//开启任务并行执行功能,需要搭配@EnableAsync使用。value指定执行任务的线程池。
@Async("asyncScheduledTakExecutor")
@Scheduled(fixedRate = 1000L)
public void taskA() throws InterruptedException {
ia++;
int sleepTime = list.get(ia % 4);
System.out.println("运行taskA" + ia + "当前时间:" + new Date() + ",当前线程:" + Thread.currentThread().getName());
Thread.sleep(sleepTime * 1000L);
}
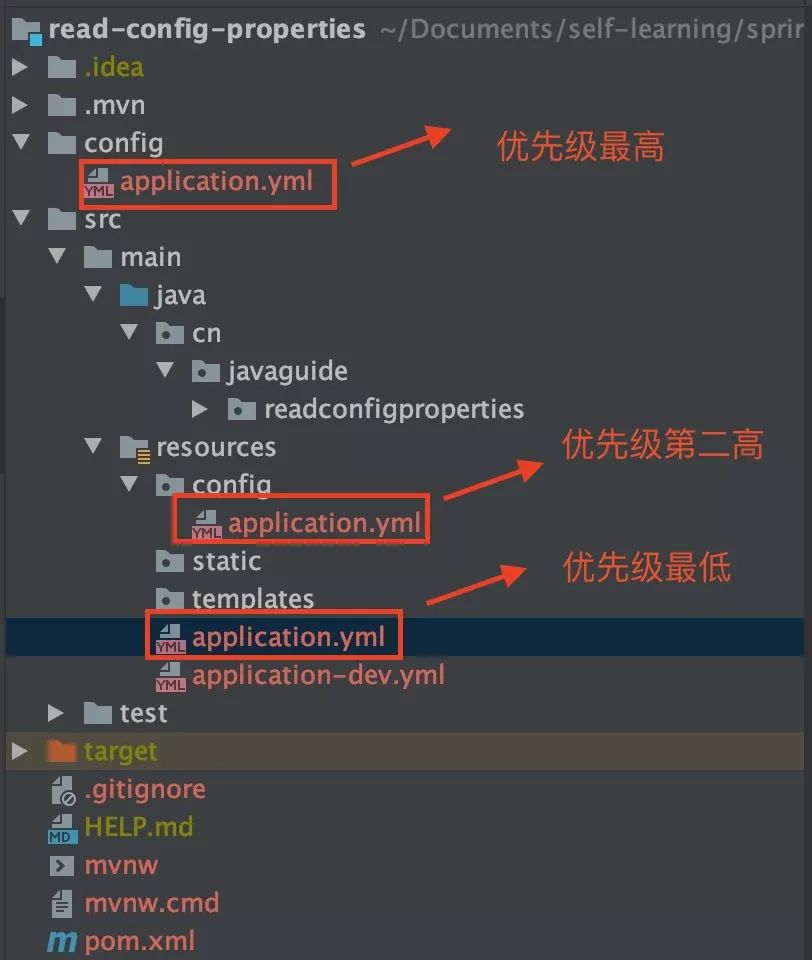
}Spring加载配置文件的优先级
Controller异常处理的三种方式
1. 使用@ControllerAdvice、@RestControllerAdvice注解类,@ExceptionHandler注解异常处理方法,处理全局Controller异常
@RestControllerAdvice
public class ControllerAdviceHandler {

    @ExceptionHandler(value = Exception.class)
    public Exception exceptionHandler(Exception e) throws Exception {
        System.out.println("exceptionHandler捕获并处理Controller异常:" + e);
        return e;
    }
}
2. 使用@ResponseStatue注解异常类,将异常类与状态码绑定。
3. 使用ResponseStauteException类,抛出异常到前端。
@RestControllerAdvice
public class ControllerAdviceHandler {

    @ExceptionHandler(value = FileNotFoundException.class)
    public ResponseStatusException fileNotFoundExceptionHandler(Exception e) {
        System.out.println("fileNotFoundExceptionHandler捕获并处理Controller异常:" + e);
        return new ResponseStatusException(HttpStatus.NOT_FOUND, e.getMessage(), e);
    }
}
Spring日志
Spring日志默认使用JCL+JUL。JCL加载日志类时,若找到log4j、slf4j这些类,就会使用这些类。 
Spring Boot日志
Spring Boot日志默认使用JCL+slf4j+logback实现。 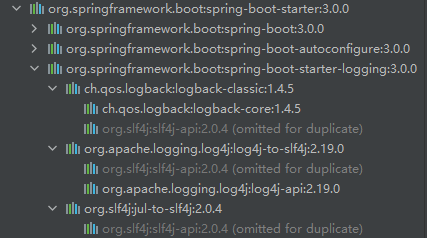
Spring Boot热部署
在pom文件中引入spring-boot-devtools依赖
<dependency>
    <groupId>org.springframework.boot</groupId>
    <artifactId>spring-boot-devtools</artifactId>
</dependency>
在配置文件中配置启动热部署
#启动或禁用devtool热部署
spring.devtools.restart.enabled=true
#增加默认配置外的热部署排除项目
spring.devtools.restart.additional-exclude=public/**
Interceptor拦截器
1. 创建一个拦截器
创建拦截器类通常通过实现HandlerInterceptor接口或继承HandlerInterceptorAdapter类来实现。HandlerInterceptor接口包含三个主要方法:
- preHandle: 在请求处理之前执行。
- postHandle: 在请求处理之后、视图渲染之前执行。
- afterCompletion: 在整个请求完成后执行。
@Component
public class MyInterceptor implements HandlerInterceptor {

    // 在请求处理之前调用
    @Override
    public boolean preHandle(HttpServletRequest request, HttpServletResponse response, Object handler) throws Exception {
        System.out.println("preHandle: 请求 URL - " + request.getRequestURL());
        // 返回 true 继续流程,返回 false 中断
        return true;
    }

    // 在请求处理之后,视图渲染之前调用
    @Override
    public void postHandle(HttpServletRequest request, HttpServletResponse response, Object handler,
                           ModelAndView modelAndView) throws Exception {
        System.out.println("postHandle: 处理完成 - " + request.getRequestURL());
    }

    // 在整个请求完成之后调用
    @Override
    public void afterCompletion(HttpServletRequest request, HttpServletResponse response, Object handler, Exception ex)
            throws Exception {
        System.out.println("afterCompletion: 请求完成 - " + request.getRequestURL());
    }
}
2. 注册拦截器
创建完拦截器后,需要将其注册到 Spring MVC 的拦截器链中。这通常通过实现 WebMvcConfigurer 接口并覆盖 addInterceptors 方法来完成。
@Configuration
public class WebConfig implements WebMvcConfigurer {

    @Autowired
    private MyInterceptor myInterceptor;

    @Override
    public void addInterceptors(InterceptorRegistry registry) {
        registry.addInterceptor(myInterceptor)
                .addPathPatterns("/**") // 拦截所有请求
                .excludePathPatterns("/static/**", "/public/**", "/error"); // 排除的路径
    }

    // 可选:配置静态资源的处理
    @Override
    public void addResourceHandlers(ResourceHandlerRegistry registry) {
        registry.addResourceHandler("/static/**")
                .addResourceLocations("classpath:/static/");
    }
}
Filter过滤器
- 使用
@WebFilter注解一个Filter接口的实现类,将其注册为Filter组件。注解的参数可以配置过滤器匹配的URL。
@WebFilter
public class CustomerFilter implements Filter {
    @Override
    public void doFilter(ServletRequest request, ServletResponse response, FilterChain chain) throws IOException, ServletException {
        System.out.println("进入到自定义的过滤器中");
        chain.doFilter(request, response);
    }
}- 使用@ServletComponentScan注解在Spring Boot启动类上,启用基于注解的Servlet组件扫描。
@SpringBootApplication
@ServletComponentScan
public class BaseSpringBootStudyMain {
    public static void main(String[] args) {
        SpringApplication.run(BaseSpringBootStudyMain.class, args);
    }

}
Spring启动时执行指定代码的方法
实现InitializingBean接口
实现InitializingBean接口并实现方法afterPropertiesSet(),Bean在创建完成后会执行afterPropertiesSet()方法
使用@PostConstruct注解
在Bean的某个方法上使用@PostConstruct注解,Bean在创建完成后会执行该方法
使用init-method
实现ApplicationListener接口
实现ApplicationListener接口并实现方法onApplicationEvent()方法,Bean在创建完成后会执行onApplicationEvent方法
实现CommandLineRunner接口
应用启动完成后执行
实现ApplicationRunner接口
应用启动完成后执行
Spring WebFlux
异步
- RouterFunction
- HandlerFunction
- Mono:Mono是一种表示零个或一个元素的响应式流。它可以用于处理只有一个结果的场景,例如从数据库中获取一个对象、调用一个远程服务并获取单个结果等。Mono提供了一系列操作符,可以对数据流进行转换、过滤、映射等操作,并且可以通过订阅来处理结果。
- Flux:Flux是一种表示零个或多个元素的响应式流。它可以用于处理包含多个结果的场景,例如从数据库中获取多个对象、从消息队列中订阅多个消息等。Flux也提供了一系列操作符,用于对数据流进行各种转换、过滤、映射等操作,并且可以通过订阅来处理结果。
- ServerRequest
- ServerResponse
SpringBoot读配置的6种方式
一、Environment
通过在Spring容器中获取Environment对象,使用environment.getProperty(String name)获取配置的值。
@SpringBootTest
public class ConfigTest {
    @Autowired
    Environment environment;

    @Test
    public void getEnvironmentConfig() {
        System.out.println(environment.getProperty("server.port"));
    }
}
二、@Value注解
@Value注解是Spring框架提供的用于注入配置属性值的注解,它可以同于类的成员变量、方法参数和构造函数参数上。使用$符号引用配置。
@SpringBootTest
public class ConfigTest {

    @Value("${server.port}")
    String port;

    @Test
    public void getConfigValue() {
        System.out.println(port);
    }
}
1. 缺失配置。
当配置文件中未对配置进行配置时,服务启动会异常,可以使用:符号配置默认值。
@SpringBootTest
public class ConfigTest {

    @Value("${server.port:7101}")
    String port;

    @Test
    public void getConfigValue() {
        System.out.println(port);
    }
}
2. 静态变量(static)赋值
静态变量是类的属性,并不属于对象的属性,而Spring是基于对象的属性进行依赖注入的,类在应用启动时静态变量就被初始化,此时Bean还未被实例化,因此不能通过@Value注入属性值。
- 我们可以先通过@Value注解将属性值注入到普通Bean中,然后获取该Bean对应的属性值,并将其赋值给静态变量。
@Component
public class Server {
    static public String port;

    @Value("${server.port}")
    public void setPort(String port) {
        Server.port = port;
    }
}

@SpringBootTest
public class ConfigTest {
    @Test
    public void getStaticPort() {
        System.out.println(Server.port);
    }
}- 或使用@Value注解构造方法的参数。
@Component
public class Server {
    static public String port;

    public Server(@Value("${server.port}") String port) {
        Server.port = port;
    }
}

@SpringBootTest
public class ConfigTest {
    @Test
    public void getStaticPort() {
        System.out.println(Server.port);
    }
}
3. 常量(final)赋值
因为final变量必须在构造方法中进行初始化,并且一旦被赋值便不能再次更改,因此要使用配置初始化final变量,需要使用@Value注解到构造方法的参数上。
@Component
public class Server {
    final public String finalPort;

    public Server(@Value("${server.port}") String port) {
        finalPort = port;
    }
}

@SpringBootTest
public class ConfigTest {
    @Autowired
    Server server;

    @Test
    public void getFinalPort() {
        System.out.println(server.finalPort);
    }
}
4. 非注册的类中使用
只有标注了@Component、@Service、@Controller、@Respository、@Configuration等容器管理注解的类,由Spring管理的bean中使用@Value注解才会生效。
5. 引用方式不对
如果我们使用new的方式获得一个类的对象,类中的@Value注解不会生效,只有通过依赖注入的方式从Spring容器中获取到的对象@Value注解才会生效。
三、@ConfigurationProperties注解
@ConfigurationProperties注解是SpringBoot提供的一种更加便捷来处理配置文件中的属性值的方式,可以通过自动绑定和类型转换等机制,将指定前缀的属性集合自动绑定到一个Bean对象上。
@Data
@Configuration
@ConfigurationProperties(prefix = "env0617")
public class EnvVar {

    private String var1;
    private String var2;

}

@SpringBootTest
public class ConfigTest {
    @Autowired
    EnvVar envVar;

    @Test
    public void getEnvVar() {
        System.out.println(envVar.toString());
    }
}
四、@PropertySources注解
除了系统默认的applicaiton.yml和application.properties文件外,我们可以使用@PropertySources注解手动指定并加载自定义的配置文件。
@Data
@Configuration
@PropertySources({@PropertySource(value = "classpath:propertysource.properties", encoding = "utf-8"), @PropertySource(value = "classpath:propertysource.properties", encoding = "utf-8")})
@ConfigurationProperties(prefix = "propertysource")
public class PropertySourceVar {
    private String var1;
    private String var2;
}

@SpringBootTest
public class ConfigTest {
    @Autowired
    PropertySourceVar propertySourceVar;

    @Test
    public void getPropertySourceVar() {
        System.out.println(propertySourceVar.toString());
    }
}
需要注意的是,
@PropertySources注解只内置了PropertySourceFactory适配器,也就是说它只能加载.properties文件。如果需要加载.yaml文件,需要自行实现YamlPropertySourceFactory,并在加载配置文件时指定适配器实现类。
五、YamlPropertiesFactoryBean加载YAML文件
我们可以使用YamlPropertiesFactoryBean类将YAML配置文件中的属性值注入到Bean中,然后使用@Value或Environment.getProperty()获取配置值。
六、自定义读取
我们可以直接注入@PropertySources获取所有属性的配置对了。
打包Spring Boot项目
默认使用Mave打包的Spring Boot项目找不到启动类,无法启动。需要在pom.xml文件中引入Spring-boot的构建插件。
<build>
    <plugins>
        <plugin>
            <groupId>org.springframework.boot</groupId>
            <artifactId>spring-boot-maven-plugin</artifactId>
        </plugin>
    </plugins>
</build>
SpringBoot启动原理
- ApplicationContextInitizlar
- ApplicationListener
- BeanFactorty
- BeanDefinition
包目录风格
基于类型
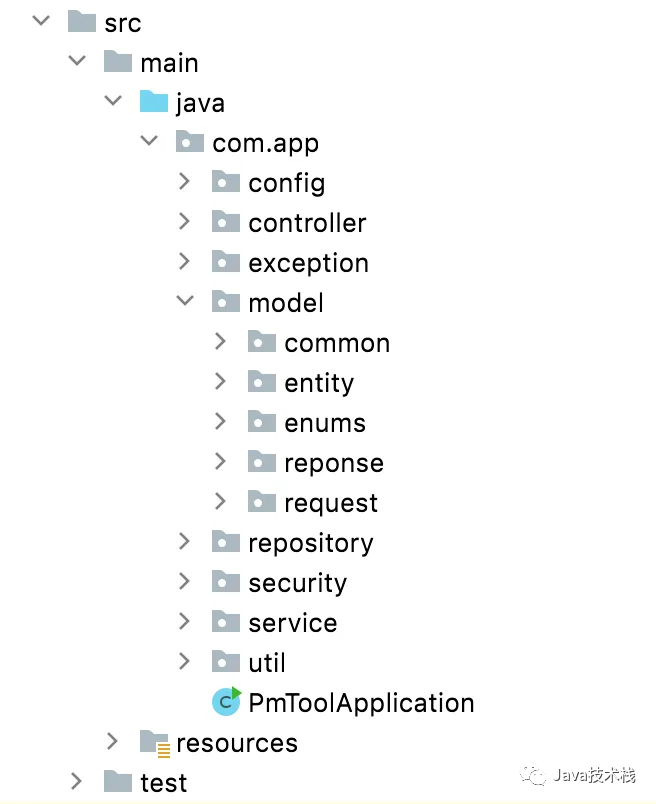
基于功能模型
