Spring项目搭建手册
创建web项目
1. 按web项目目录结构搭建项目。
在src/main下创建webapp目录,在webapp目录下创建WEB-INF目录,在WEB-INF目录下添加web.xml文件。在webapp目录下创建static目录,存放静态资源。在webapp目录下添加index首页文件。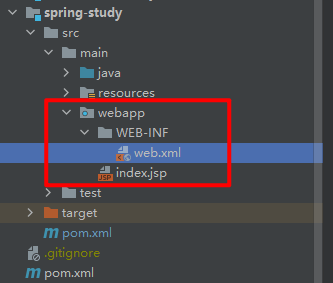
2. 添加web项目依赖
在pom文件中添加相关依赖。
<!--支持servlet-->
<dependency>
    <groupId>javax.servlet</groupId>
    <artifactId>javax.servlet-api</artifactId>
    <version>4.0.1</version>
</dependency>
<!--支持jsp-->
<dependency>
    <groupId>javax.servlet.jsp</groupId>
    <artifactId>jsp-api</artifactId>
    <version>2.2.1-b03</version>
</dependency>
  <!--支持jstl-->
<dependency>
    <groupId>javax.servlet</groupId>
    <artifactId>jstl</artifactId>
    <version>1.2</version>
</dependency>
3.打包与部署
将项目打包成war包,部署到web中间服务器,即可在浏览器访问到项目。
集成Spring
1. 添加Spring的依赖
1.1 添加Spring项目清单spring-framework-bom
spring-framework-bom是Spring的一个项目清单,清单里面添加了很多Spring的组件依赖和版本,可以用于统一管理Spring组件的版本,避免使用不同版本的组件导致意外情况发生。推荐在Spring项目中添加
<dependencyManagement>
  <dependencies>
    <dependency>
      <groupId>org.springframework</groupId>
      <artifactId>spring-framework-bom</artifactId>
      <version>4.3.4.RELEASE</version>
      <type>pom</type>
      <scope>import</scope>
    </dependency>
  </dependencies>
</dependencyManagement>
1.2 添加Spring组件依赖
Spring核心组件包括ioc容器和aop切面功能。
<!--Spring核心及ioc容器功能-->
<dependency>
  <groupId>org.springframework</groupId>
  <artifactId>spring-context</artifactId>
</dependency>
<!--Spring aop功能-->
<dependency>
  <groupId>org.springframework</groupId>
  <artifactId>spring-aop</artifactId>
</dependency>
2. 添加Spring配置文件applicationContext.xml
在src/main/resource目录下添加applicationContext.xml文件,该文件用于注册bean。在Spring启动时会加载xml信息,同时初始化bean到容器中。
<?xml version="1.0" encoding="UTF-8" ?>
<beans xmlns:xsi="http://www.w3.org/2001/XMLSchema-instance"
       xmlns="http://www.springframework.org/schema/beans"
       xmlns:tx="http://www.springframework.org/schema/tx"
       xmlns:aop="http://www.springframework.org/schema/aop"
       xmlns:mvc="http://www.springframework.org/schema/mvc"
       xmlns:context="http://www.springframework.org/schema/context"
       xsi:schemaLocation="http://www.springframework.org/schema/beans
       http://www.springframework.org/schema/beans/spring-beans.xsd       http://www.springframework.org/schema/tx       http://www.springframework.org/schema/tx/spring-tx.xsd       http://www.springframework.org/schema/mvc       http://www.springframework.org/schema/mvc/spring-mvc.xsd       http://www.springframework.org/schema/aop       http://www.springframework.org/schema/aop/spring-aop.xsd       http://www.springframework.org/schema/context       http://www.springframework.org/schema/context/spring-context.xsd">

    <context:component-scan base-package="com.chenzhuowen.springstudy.service.impl"/>

    <bean id="messageService" class="com.chenzhuowen.springstudy.inter.impl.MessageServiceImpl">
        <constructor-arg name="message" value="my message"></constructor-arg>
    </bean>
</beans>context:component-scan:用于配置Spring自动递归扫描指定包下注解了@Component的类,加载到容器中。bean:自定义bean
xsd文件
表示该xml里的元素和属性等需符合xsd这个文档类型定义标准。
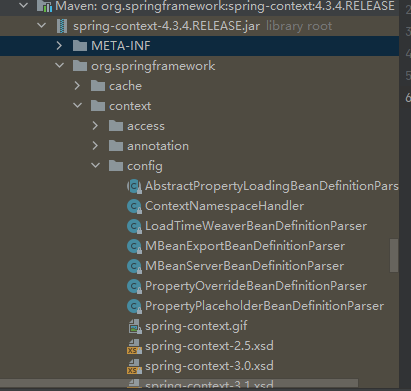
spring在加载xml文件时,会加载xsd文件校验xml文件是否符合标准。默认情况下,spring会优先从本地获取xsd文件。通过spring的jar包的META-INF目录下的spring.schemas和spring.handers可以返回org.springframework.context.config包下的xsd文件的路径。
如xml中的xsd文件没有配置版本,默认返回jar包对应的版本。如果本地找不到xsd文件,才会向网络加载。如果网络下载失败,则会报错并且应用启动失败。 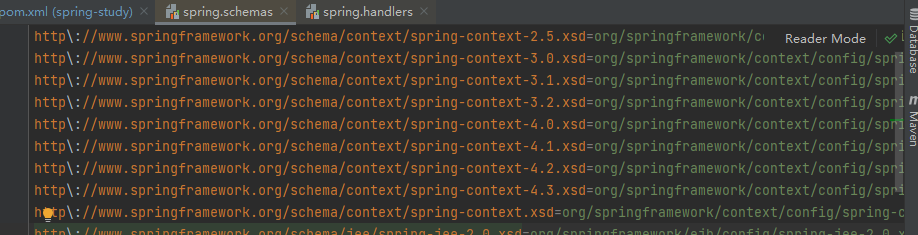

3. 启动类中加载applicationContext.xml启动Spring容器
这种方法主要用在的普通的非web的项目中,手工编码加载配置文件创建Spring容器。
public class SpringMain {

    private static final Log log = LogFactory.getLog(SpringMain.class);

    public static void main(String[] args) {
        GenericXmlApplicationContext context = new GenericXmlApplicationContext();
        context.setValidating(false);//关闭xsd验证
        context.load("classpath:applicationContext.xml");
        context.refresh();
//        ApplicationContext context = new ClassPathXmlApplicationContext("classpath:applicationContext.xml");
        log.info("context 启动成功");
        MessageService messageService = context.getBean(MessageService.class);
        System.out.println(messageService.getMessage());
    }
}
Spring MVC
1. 添加Spring MVC依赖
在pom文件中添加Spring MVC依赖
<!--web项目-->
<dependency>
  <groupId>org.springframework</groupId>
  <artifactId>spring-web</artifactId>
</dependency>
<!--添加mvc功能-->
<dependency>
  <groupId>org.springframework</groupId>
  <artifactId>spring-webmvc</artifactId>
</dependency>
SpringMVC辅助组件
<!--SpringMVC转换成json-->
<dependency>
    <groupId>com.fasterxml.jackson.core</groupId>
    <artifactId>jackson-databind</artifactId>
    <version>2.14.2</version>
</dependency>
2. 添加Spring MVC配置文件
在src/main/resources目录下新增Spring MVC配置文件servlet.xml。
<?xml version="1.0" encoding="utf-8" ?>
<beans xmlns="http://www.springframework.org/schema/beans"
       xmlns:xsi="http://www.w3.org/2001/XMLSchema-instance"
       xmlns:context="http://www.springframework.org/schema/context"
       xmlns:mvc="http://www.springframework.org/schema/mvc"
       xsi:schemaLocation="http://www.springframework.org/schema/beans
http://www.springframework.org/schema/beans/spring-beans.xsd
http://www.springframework.org/schema/mvc
http://www.springframework.org/schema/mvc/spring-mvc.xsd
http://www.springframework.org/schema/context
http://www.springframework.org/schema/context/spring-context.xsd"
>
    <mvc:annotation-driven/>
    <mvc:resources mapping="/static/**" location="static/"/>
    <context:component-scan base-package="com.chenzhuowen.springstudy.controller"/>
    <bean class="org.springframework.web.servlet.view.InternalResourceViewResolver">
        <property name="viewClass" value="org.springframework.web.servlet.view.JstlView"/>
        <property name="prefix" value="/WEB-INF/jsp/"/>
        <property name="suffix" value=".jsp"/>
</bean></beans>mvn:annotation-driven:启用Controller注解支持mvc:resources:配置静态资源地址映射规则context:component-scan:用于配置Spring自动递归扫描指定包下的类,加载到容器中。这里的配置表示扫描controller包下注解了@controller的类。InternalResourceViewResolver:将视图名映射为 URL 文件
3. 配置web.xml文件
集成Spring和Spring MVC后,还需要配置web.xml文件,添加Spring和Spring MVC功能。
3.1 在web.xml中配置Spring容器
通过context-param的contextConfigLocation指定spring配置文件的路径,使web项目启动时能够加载spring配置文件。同时还要添加web上下文监听器。
<context-param>
    <param-name>contextConfigLocation</param-name>
    <param-value>classpath:applicationContext.xml</param-value>
</context-param>

<listener>
    <listener-class>org.springframework.web.context.ContextLoaderListener</listener-class>
</listener>
针对SpringMVC还需要添加以下配置:
<!--配置DispatcherServlet,参数contextConfigLocation指定Spring MVC配置文件并加载-->
<servlet>
  <servlet-name>springmvc</servlet-name>
  <servlet-class>org.springframework.web.servlet.DispatcherServlet</servlet-class>
  <init-param>
    <param-name>contextConfigLocation</param-name>
    <param-value>classpath:applicationServlet.xml</param-value>
  </init-param>
  <load-on-startup>1</load-on-startup>
</servlet>
<servlet-mapping>
  <servlet-name>springmvc</servlet-name>
  <url-pattern>/</url-pattern>
</servlet-mapping>
<!--添加编码过滤器配置-->
<filter>
  <filter-name>SpringEncodingFilter</filter-name>
  <filter-class>org.springframework.web.filter.CharacterEncodingFilter</filter-class>
  <init-param>
    <param-name>encoding</param-name>
    <param-value>UTF-8</param-value>
  </init-param>
  <init-param>
    <param-name>forceEncoding</param-name>
    <param-value>true</param-value>
  </init-param>
</filter>
<filter-mapping>
  <filter-name>SpringEncodingFilter</filter-name>
  <url-pattern>/*</url-pattern>
</filter-mapping>
4. 添加controller类
添加controller类,使用@controller注解类,使用@RequestMapping注解方法配置映射的路径。
@Controller
public class AppController {
    final MessageService messageService;
    final Log log = LogFactory.getLog(AppController.class);

    @Autowired
    public AppController(MessageService messageService) {
        this.messageService = messageService;
    }

    @RequestMapping({"/index", ""})
    public ModelAndView index() {
        ModelAndView mv = new ModelAndView("index");
        mv.addObject("now", new Date());
        System.out.println("123");
        return mv;
    }

    @GetMapping("/message")
    public void getMessage() {
        log.info(messageService.getMessage());
    }
}
5. 打包和部署
将项目打包成war包,部署到web中间服务器,即可在浏览器访问到项目。